
How to Outline Text in Adobe Illustrator

In this quick and easy tutorial for Adobe Illustrator, you’ll learn how to transform your text into fully editable vector shapes by outlining them. This process is essential for designers looking to apply more advanced manipulation to their text, such as customizing strokes, changing fills, or reshaping letters, without the constraints of standard text formatting. Outlining text not only enhances your creative flexibility but also ensures your designs remain consistent and fully accessible across different platforms and devices. Whether you’re preparing artwork for print, collaborating on projects, or simply looking to explore new design possibilities, this guide will walk you through the steps to effectively outline text in Illustrator, unlocking a new realm of design potential.
1. Open Your Project and Select Text

Start by launching Adobe Illustrator and opening your project file. Once the project is open, navigate through your artboard and click on the text you wish to outline, making it the active selection for the next steps.
2. Converting Text to Outlines via Type Menu
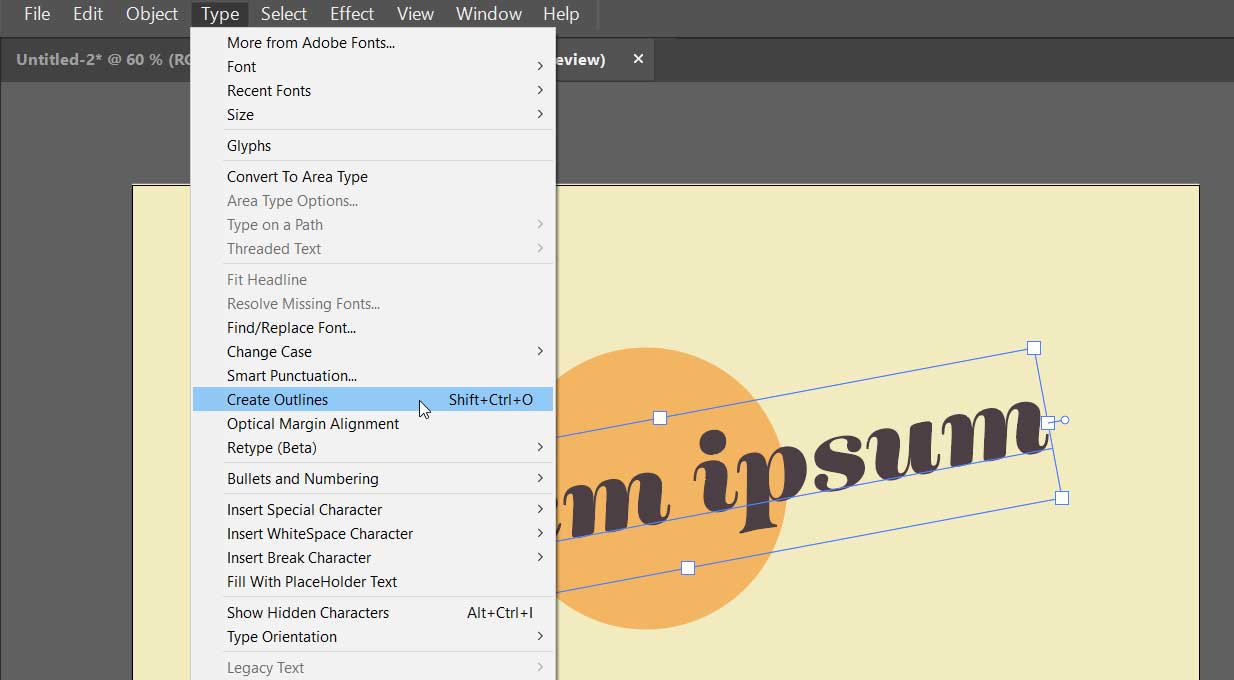
With the text selected, head to the top menu bar and click on the Type menu. From the dropdown options, select Create Outlines. Alternatively, you can use a keyboard shortcut for a quicker action: Shift + Cmd + O on a Mac or Shift + Ctrl + O on Windows. This crucial step transforms your text into a vector shape, removing its text properties and enabling further graphic manipulation.
3. Customizing the Outlined Text

After your text has been converted to outlines, it transforms into a vector shape, allowing for advanced customization similar to any other Illustrator shape. This enables adding strokes, changing fill colors, or adjusting individual points with the Direct Selection Tool (the white arrow) for precise edits. Your outlined text is now fully prepared for any creative or production purposes.
Alternative Method: Using the Contextual Toolbar to Outline Text
For users of the latest versions of Adobe Illustrator, the process of outlining text has been made even more straightforward, thanks to an update to the contextual toolbar. This method provides a quick, one-click option to convert text to outlines, perfect for streamlining your workflow.
Step 1: Select Your Text
Open your project and use the Selection Tool (shortcut V) to click on the text you wish to outline. This action makes the text the active selection and prepares it for outlining.
Step 2: Use the Contextual Toolbar
With your text selected, locate the large “T” icon in the contextual toolbar. This toolbar adapts based on your current selection, providing relevant tools and options. Clicking on the big “T” icon will directly convert your selected text to outlines, bypassing the need to navigate through menus. This feature is available exclusively in newer versions of Illustrator.
If You Don’t See the Toolbar in Adobe Illustrator
If you don’t see the contextual toolbar in Adobe Illustrator, it might be because your version doesn’t have this feature. First, check the Window menu to make sure it hasn’t just been turned off. If you don’t find the contextual toolbar option there, then it’s time to update Illustrator to the latest version. Updating ensures you gain access to the contextual toolbar and all the convenient features it offers.