How to Easily Change Default Language, Add, and Remove Languages in Windows 11?
Changing the language in Windows 11 can seem like a challenging task, but it doesn’t have to be. This guide walks you through the steps to adjust your computer’s language settings, making it easier for you to use your device in the language you feel most comfortable with. Whether you’re looking to switch your default language, add a new one, or remove languages you no longer use, this manual provides clear, step-by-step instructions to make these changes effortlessly. Let’s dive into the process and ensure your computer aligns perfectly with your language preferences.
Changing the Default Language in Windows 11
Switching the default language in Windows 11 enables you to interact with your device using the language that feels most natural to you. This change affects menus, dialog boxes, settings, and other interface elements, providing a comprehensive user experience in your preferred language. Here’s how to change the default language in Windows 11, broken down into simple, easy-to-follow steps.
Step 1: Access the Settings App
- Press the Windows key + I on your keyboard to open the Settings app. This is your control center for making adjustments to your system.
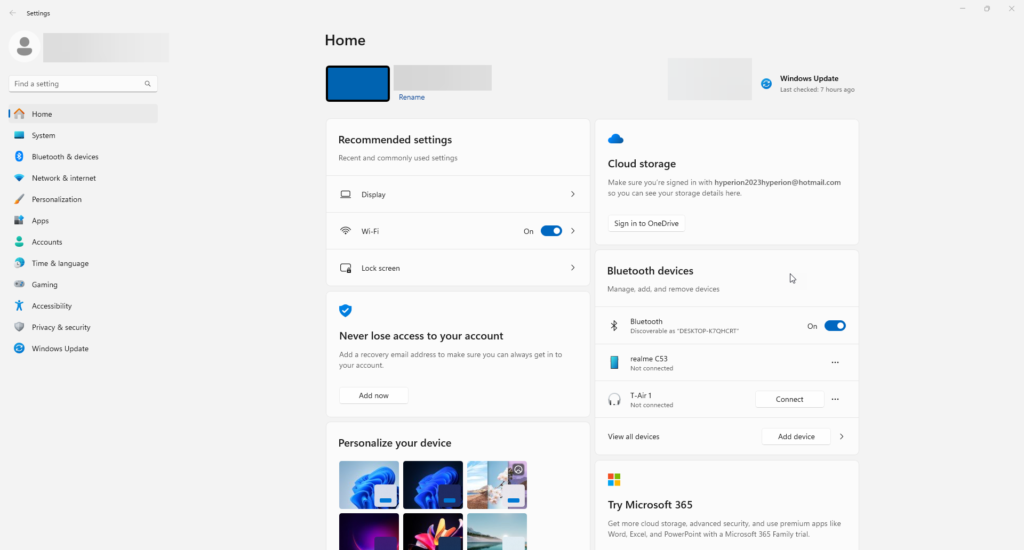
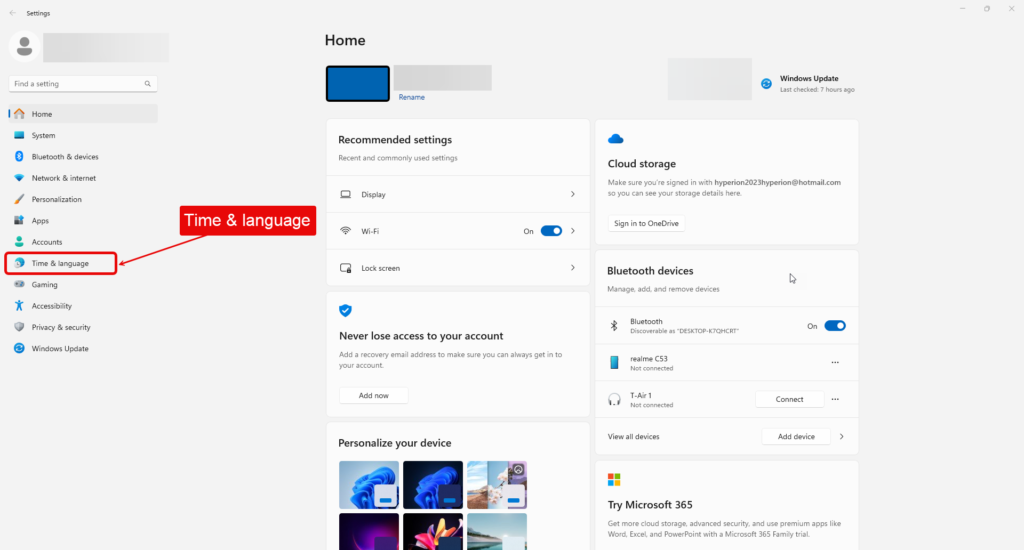
Step 2: Navigate to Time & Language
- In the Settings window, click on “Time & language” on the left sidebar. This section contains options related to regional and language settings.

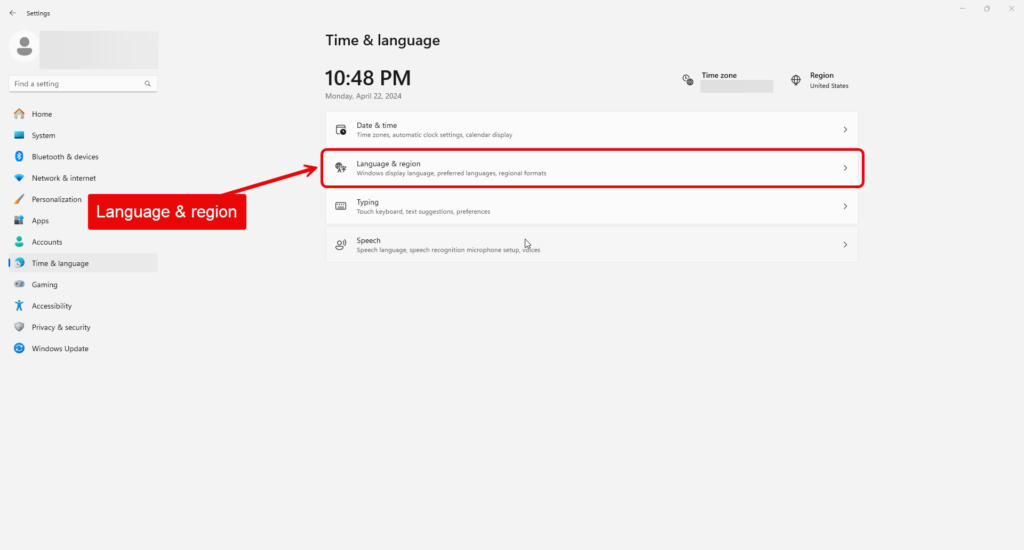
Step 3: Select Language & Region
- Once you’re in the Time & Language settings, look for and click on “Language & region.” Here, you’ll find all settings related to languages.

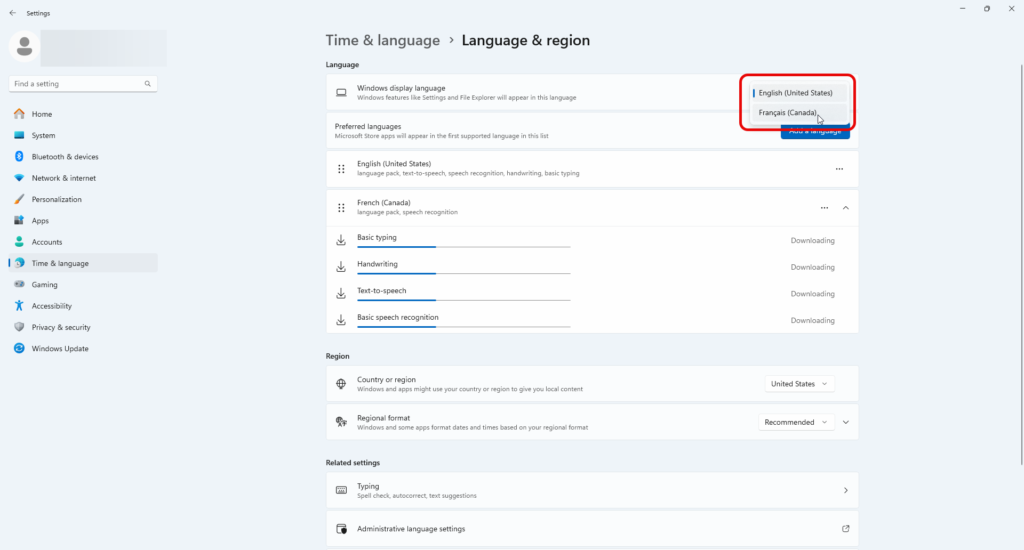
Step 4: Change Your Windows Display Language
- Under the “Windows display language” section, you’ll see a drop-down menu. Click on it and select the language you wish to set as the default. If the language you want isn’t listed, you may need to add it first (covered in the section on adding a new language).

Step 5: Apply the Changes
- After selecting your new default language, you may be prompted to sign out of your account. Sign back in to see the changes applied across your system. Some elements might require a restart of your PC to fully transition to the new language.
Step 6: Check for Language Packs
- If certain elements or apps do not display in your new default language, you may need to download a language pack for that language. Navigate back to “Language & region” and click on the language you’ve set as default. Select “Options” and download any available language packs.
Step 7: Adjusting Regional Formats (Optional)
- For a truly localized experience, consider adjusting the regional format settings. This ensures that dates, times, and other formats match the conventions of your selected language. In the “Language & region” settings, look for “Regional format” and select the appropriate option from the drop-down menu.
By following these steps, you can easily change the default language in Windows 11, making your computer more personalized and easier to use. Whether you’re adjusting your system for personal comfort, work requirements, or learning a new language, Windows 11 offers the flexibility to meet your needs.
Adding a New Language in Windows 11
Introducing a new language to your Windows 11 system not only customizes your computing experience but also enhances accessibility, especially when you’re multilingual or learning a new language. Adding languages allows you to switch between them for different tasks, such as typing, reading, or using apps. Follow these detailed steps to add a new language to your Windows 11 device.
Step 1: Open the Settings App
- Initiate the process by pressing Windows key + I, which opens the Settings app. This is your gateway to customizing various aspects of your Windows experience.

Step 2: Go to Time & Language
- Within Settings, find and click on “Time & language” on the left-hand menu. This section houses all settings related to language and regional preferences.
Step 3: Access Language & Region
- Look for the “Language & region” option and click on it. This area lets you manage all language-related settings on your device.
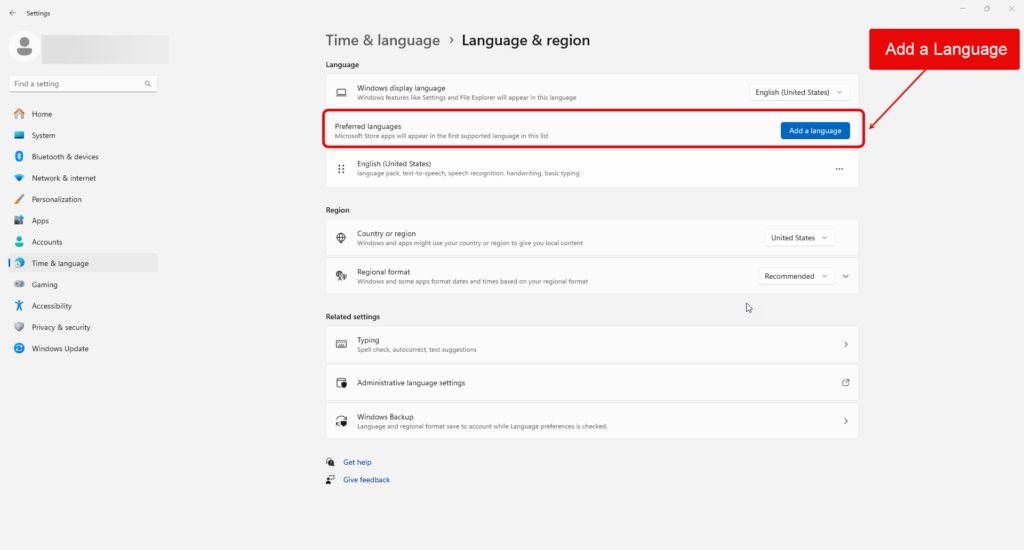
Step 4: Add a Language
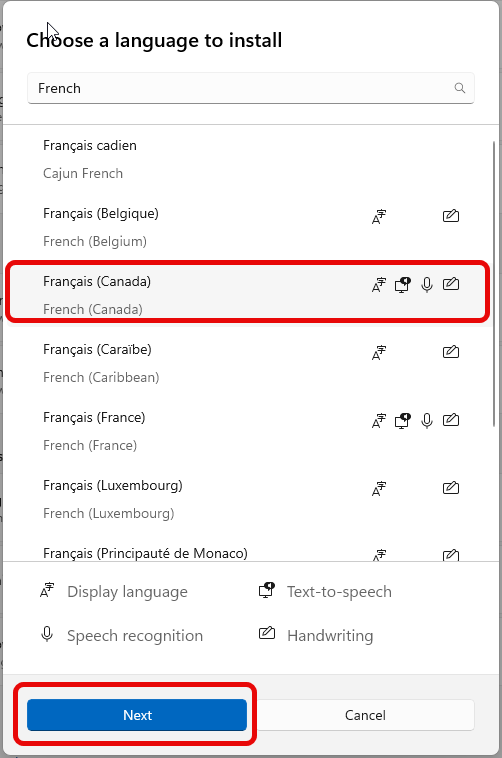
- Spot the “Add a language” button, represented by a plus sign (+) and click on it. This action opens a new window where you can search for and select the language you wish to add.
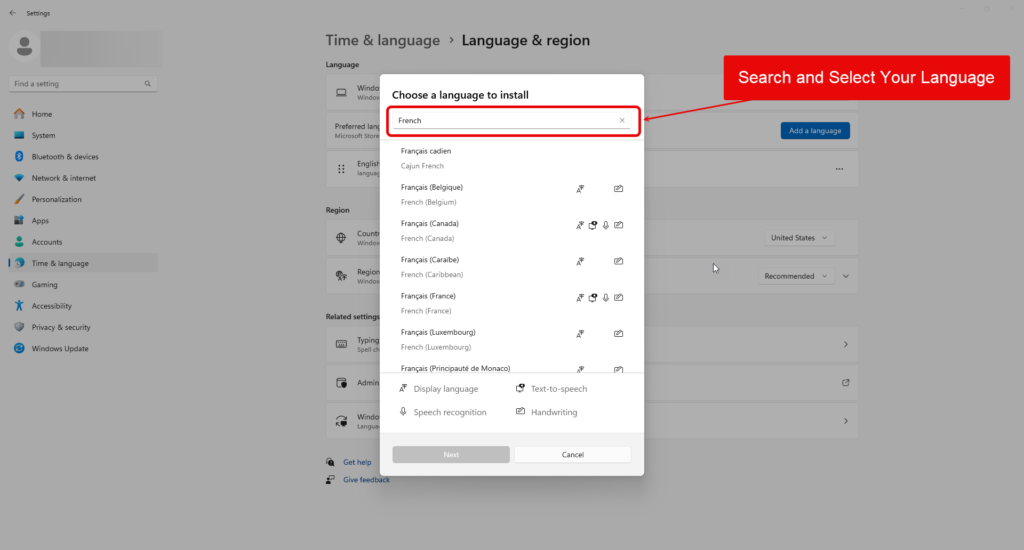
Step 5: Search and Select Your Language
- In the search box, type the name of the language you’re interested in adding. The system will show you a list of available languages that match your search criteria. Select the language you want to add by clicking on it.
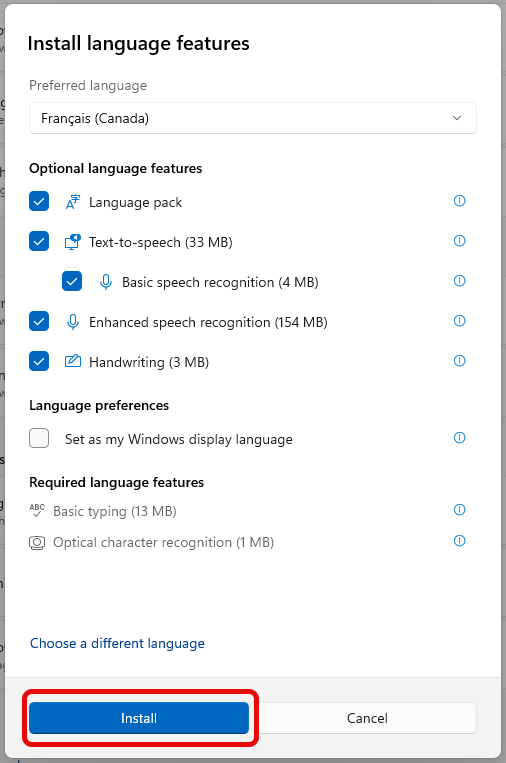
Step 6: Choose Language Features
- After selecting a language, you’ll have the option to choose specific features such as handwriting recognition, speech, and others, depending on the language. Select the features you need and click “Next.”
Step 7: Install the Language
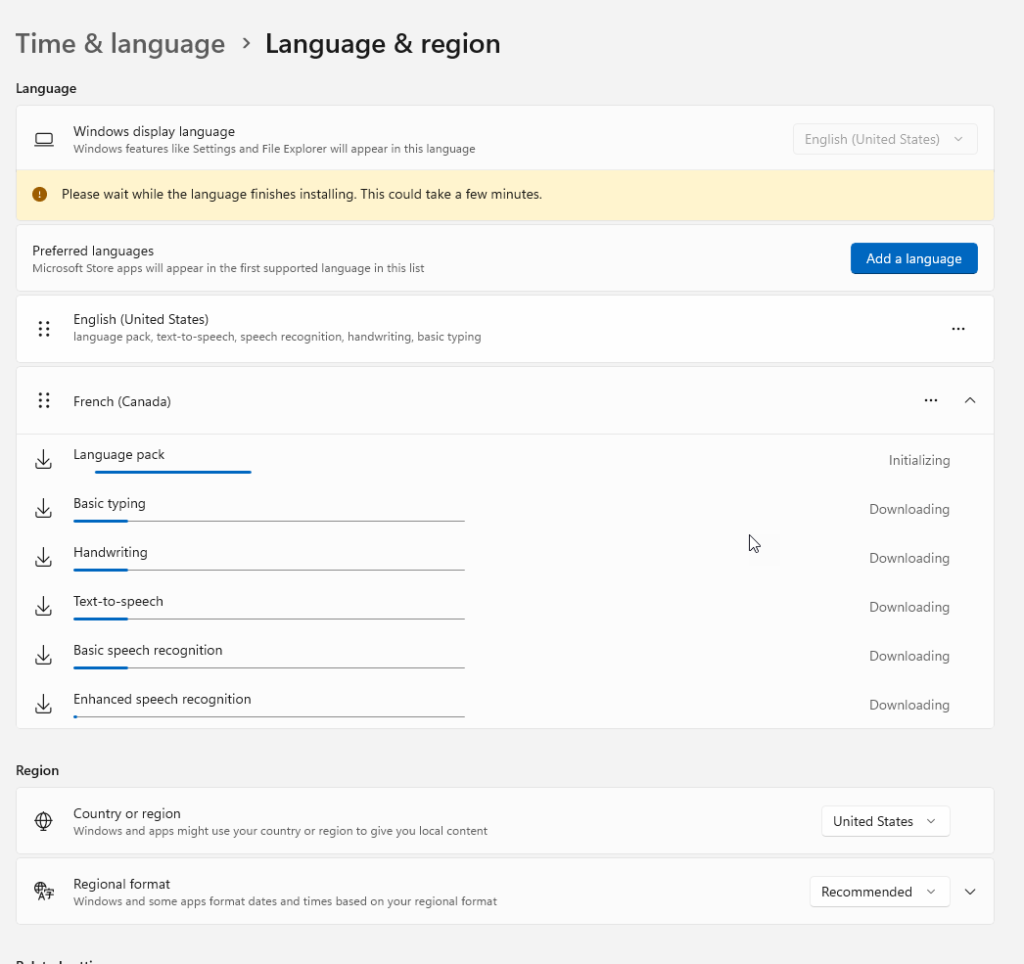
- Review your selections, including any language features, and click “Install” to add the language to your system. The installation process may take a few moments, depending on your internet connection and the size of the language pack.
Step 8: Set as Display Language (Optional)
- Once the language is added, you can set it as your display language by going back to the “Windows display language” drop-down menu in the “Language & region” settings and selecting your newly added language. Remember, you might need to sign out and back in for the changes to take effect fully.

Step 9: Add Language to Keyboard (Optional)
- If you intend to type in the new language, ensure that it’s added to your keyboard layout options. This can usually be set automatically with the language pack, but you can also manually adjust keyboard settings in the “Language & region” section.
By adding new languages to your Windows 11 system, you expand your device’s versatility, making it a more effective tool for communication, learning, and entertainment in a globalized world.
Removing Languages in Windows 11
Over time, you might find your Windows 11 system cluttered with languages you no longer use or need. Removing these languages can simplify your settings and make your experience more streamlined. Here’s a comprehensive guide on how to remove languages from your Windows 11 device, ensuring that your computer aligns with your current language preferences.
Step 1: Access the Settings App
- Begin by pressing Windows key + I to open the Settings app. This central hub allows you to adjust and customize your Windows 11 experience.

Step 2: Navigate to Time & Language
- In the Settings window, locate and click on “Time & language” from the menu on the left. This section is dedicated to managing your device’s regional and language settings.

Step 3: Select Language & Region
- Scroll to find “Language & region” and click on it. This page lets you manage all aspects of language settings on your Windows 11 device.

Step 4: Identify the Language to Remove
- Under the “Preferred languages” section, you will see a list of all languages currently installed on your system. Each language entry has a corresponding three-dot menu (…).
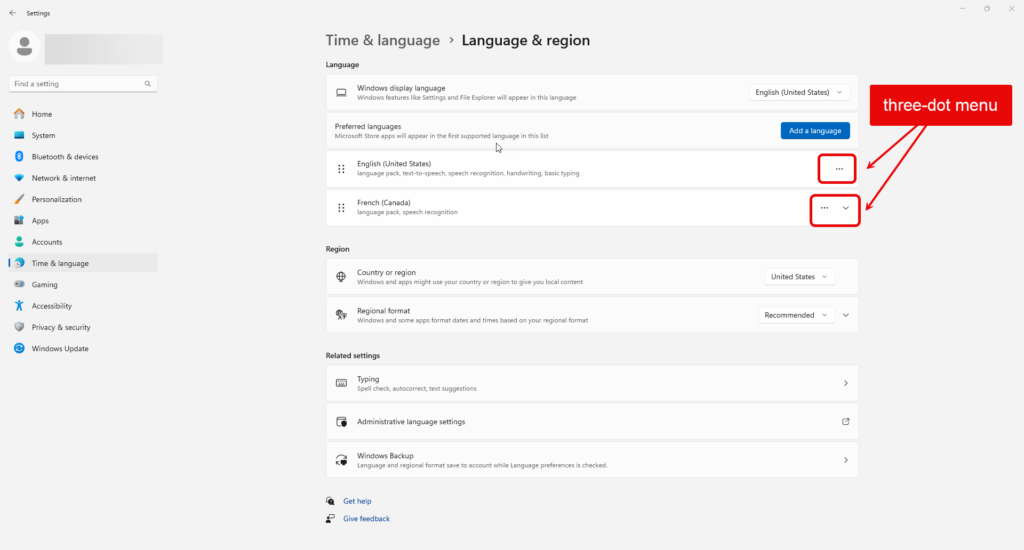
Step 5: Remove the Language
- Find the language you wish to remove and click on the three dots (…) next to it. Select “Remove” from the drop-down menu. This action prompts Windows 11 to begin the removal process for the selected language.

Step 6: Confirm the Removal
- You may be asked to confirm your decision to remove the language. Confirm the action if prompted, and the system will proceed to remove the language from your device.
Step 7: Check and Adjust Additional Settings (Optional)
- After removing a language, it’s a good idea to check other related settings, such as keyboard layouts and regional formats, to ensure they still align with your preferences. If the removed language was associated with specific settings, you might need to adjust them manually.
Step 8: Restart Your Computer (Optional)
- While not always necessary, restarting your computer can help ensure all changes are fully applied and that any remnants of the removed language are cleared from your system.
By following these steps, you can easily manage your language settings in Windows 11, removing any languages that no longer serve your needs. This process helps keep your system organized and tailored to your current language preferences, enhancing your overall user experience.
References
For further details and in-depth understanding, consider exploring the following resources:
- For detailed instructions on managing input and display language settings in Windows, including changing the keyboard layout, adding languages, and installing language packs, refer to the Microsoft support page: Manage the input and display language settings in Windows.
- Microsoft Documentation: Microsoft documentation: https://learn.microsoft.com/en-us/windows/ (Search for “Manage language settings in Windows” for detailed information)